What is the PROACT trial?
Due to the high morbidity and mortality of NSTEMI and CHF as well as the success of the VHR process. It has spawned the Providing Rapid out of hOspital Acute Cardiovascular Treatment. With the integration of point of care testing into EMS this will allow for early diagnosis, triage, and treatment. PROACT will be using point of care field testing for Troponins and BNP to help identify NSTEMI and CHF. Troponin is a regulatory protein in cardiac muscle and one of the cardiac bio markers of choice for point of care testing. B-type natriuretic peptide (or Brain Natriuretic Peptide) is a cardiac neurohormone specifically secreted from the cardiac ventricles as a response to ventricular volume expansion, pressure overload, and resultant increased wall tension. BNP is used in the diagnosis of AHF.
Abnormal test findings will be defined as:
Troponin I Abnormal >0.01 ng/ml
BNP Abnormal >5 pg/ml
Beginning the PROACT study:
Inclusion criteria
1. Patient activation of the EMS system for symptoms of acute chest discomfort or dyspnea for which acute coronary disease or heart failure is deemed to be the most probable diagnosis.
2. Patient is older than 18
3. Patients able to give informed consent
Exclusion criteria
1. Patient with documented ST elevation on the initial 12 lead ECG
2. Patients with a prior diagnosis that is compatible with recurrent symptoms of dyspnea or chest discomfort i.e. severe asthma, etc.
How do I enroll a patient that meets the criteria?
1.The Verbal Script Form; Read patient the Verbal Script form on the PROACT worksheet attached to the container, then sign bottom. This simply means you read the patient the consent form and they agree to participate, they will be contacted and given separate informed consent form by research staff.
Next: Open the internet browser on the tablet
2. Select bookmarked trial website
3. Enter username and password (sticker on box)
4. Follow prompts on website
5. You will be randomized into Group 1(Continue with standard of care) or Group 2( Point of Care testing)
Patient enrolled into Group 1
1. Continue with regular standard of care, ensure PROACT worksheet is filled out, faxed and attached to PCR
Patient enrolled into Group 2
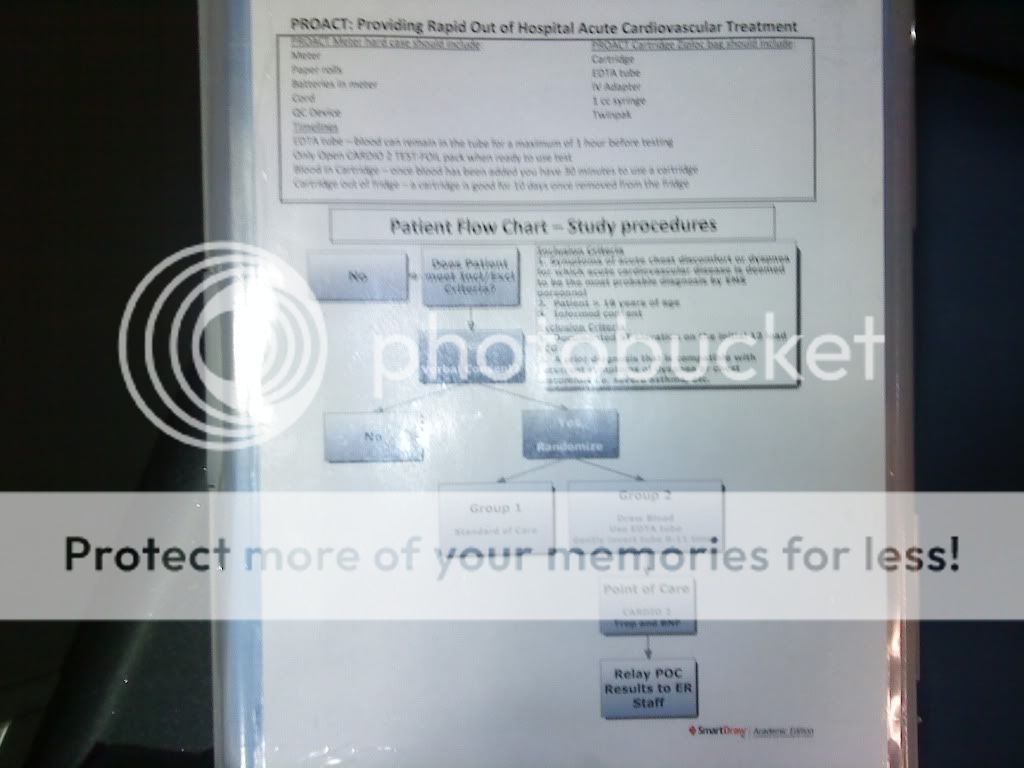
1. Continue Standard of care, and follow flow chart:
2. Blood Draw and point of care testing
3. Insure PROACT worksheet is filled out, faxed , then attached to PCR
What’s in the Box?
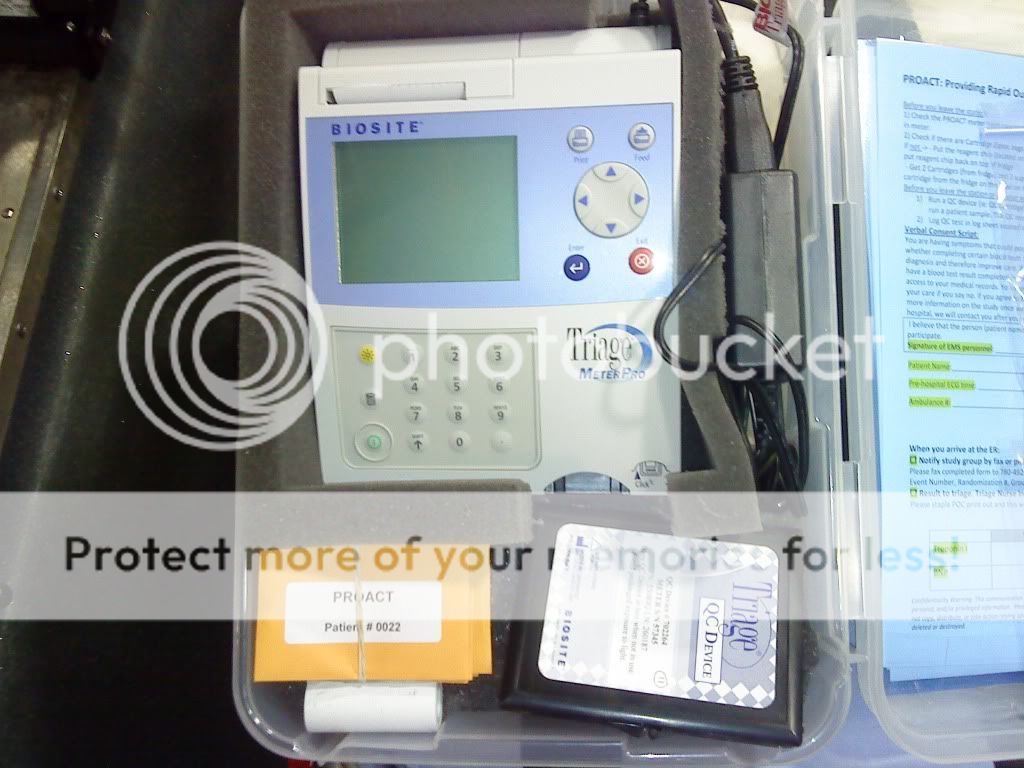
1: The Alere TRIAGE Meter, our point of care testing device:
What is it? Fluorometer designed to provide point of care testing for Troponin I and BNP cardiac markers using the Cardio 2 test device. It will give you Quantitative Results in ~ 20 minutes in the form of a print out. (Looks like a receipt).
2. A Black Box
This is a Quality Control Device. The only one that applies to the road staff is the Quality Control Test Device. It looks like a Test Device, except its colored differently (BLACK). They are pertinent for each meter. The QC Code Chip also in the black box is to be left in the box untouched. The test device is reusable and needs to be run at the start of each shift to insure the meter is calibrated; the laser is stable and accurately positioned. Without a passed QC test the meter will not function. Should the machine fall, or an extremely rough ride it needs to be retested to insure valid results and quality control. Record the daily check in the log sheet in the blue binder.
3. Paper rolls for the printer, an A/C cord (wall connection).
The Machine is to be left plugged in, and in the box and on the counter at all times. Should the paper run out the extra roll is to be inserted in the compartment on top of the screen. Insert it so as the paper runs along the top of the machine not across the roll. Feed into black roller, once in place press feed button and remove excess. Replace cover.
4. Purple topped tube/ Blue cylinder/IV blood draw adapter.
How do I use these things? Using the best possible sterile technique for the environment the IV adapter screws into the blue cylinder. Then the adapter is to screw onto the catheter hub. Once connected, place the EDTA (purple tube) into the cylinder and push onto male end filling the tube. The tube must then be inverted 6-8 times gently. This prevents coagulation of the sample preventing clots from ruining the test.
5. 1cc syringe and twin pak.
These items are utilized to remove .25cc exactly (any more or less , or any bubbles will result in an error message). Insert the needle into the top of the EDTA tube and withdraw .25cc ensuring all bubbles are removed from syringe for accurate sample size. Then place into sample port.
6. Two Cardio 2 test devices
What is the Cardio 2 test device? The Cardio 2 Device is a sample vehicle that has a reaction zone which contains fluorescence antibodies that have the ability to emit light. During the reaction analyte molecules in the sample react with the labelled antibodies creating a fluorescence analyte that can be quantified by the amount of fluorescent light they emit when excited by the laser. This process in turn analyzes the Troponin I and BNP levels in said blood sample.
IMPORTANT FACTS ABOUT CARDIO 2 TEST DEVICES
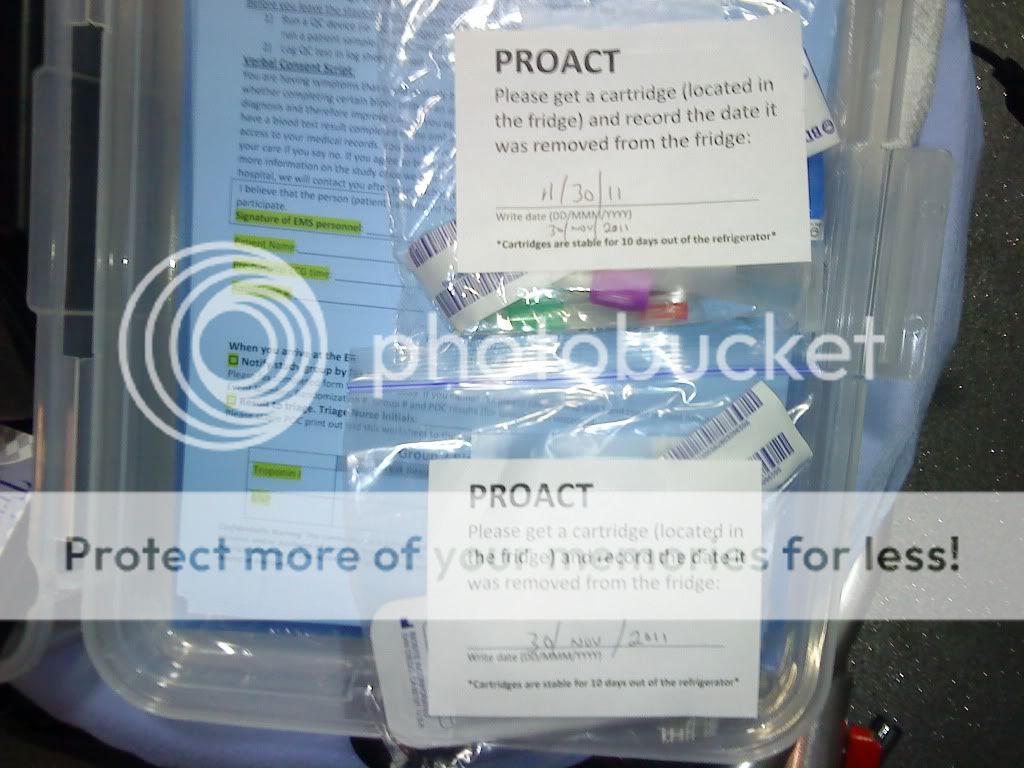
1. They must be kept refrigerated, once removed from fridge they cannot be replaced.
2. Once removed from the fridge each Device has a shelf life of 10 days at room temperature. Therefore, after the Cardio 2 Device is removed from the fridge, write the date it was removed on the foil package with the black marker provided on top of the fridge.
3. Just like Glucometers, Cardio 2 Devices must be calibrated with the reagent chip which is also in the Cardio 2 Test Device box in the fridge. It must be inserted in the meter and calibrated prior to using the device. This only has to be done when a different lot number is used. Lot numbers can be found on the side of the boxes as well as the testing devices.
4. They must sit for 15 minutes out of the fridge prior to being used to allow them to warm to room temperature
5. Do not remove the devices from the pouch until you’re prepared to use it.
6. When placing blood onto device slowly place .25cc into sample port allowing blood to saturate into sample port then insert into machine (Once you place blood into the sample port you have 30 minutes to insert it into the machine).Insert until resistance is felt and a click is heard. Then press BLUE (ENTER) BUTTON. Meter will then automatically insert device. Dispose of test device once test complete.
Due to the high morbidity and mortality of NSTEMI and CHF as well as the success of the VHR process. It has spawned the Providing Rapid out of hOspital Acute Cardiovascular Treatment. With the integration of point of care testing into EMS this will allow for early diagnosis, triage, and treatment. PROACT will be using point of care field testing for Troponins and BNP to help identify NSTEMI and CHF. Troponin is a regulatory protein in cardiac muscle and one of the cardiac bio markers of choice for point of care testing. B-type natriuretic peptide (or Brain Natriuretic Peptide) is a cardiac neurohormone specifically secreted from the cardiac ventricles as a response to ventricular volume expansion, pressure overload, and resultant increased wall tension. BNP is used in the diagnosis of AHF.
Abnormal test findings will be defined as:
Troponin I Abnormal >0.01 ng/ml
BNP Abnormal >5 pg/ml
Beginning the PROACT study:
Inclusion criteria
1. Patient activation of the EMS system for symptoms of acute chest discomfort or dyspnea for which acute coronary disease or heart failure is deemed to be the most probable diagnosis.
2. Patient is older than 18
3. Patients able to give informed consent
Exclusion criteria
1. Patient with documented ST elevation on the initial 12 lead ECG
2. Patients with a prior diagnosis that is compatible with recurrent symptoms of dyspnea or chest discomfort i.e. severe asthma, etc.
How do I enroll a patient that meets the criteria?
1.The Verbal Script Form; Read patient the Verbal Script form on the PROACT worksheet attached to the container, then sign bottom. This simply means you read the patient the consent form and they agree to participate, they will be contacted and given separate informed consent form by research staff.
Next: Open the internet browser on the tablet
2. Select bookmarked trial website
3. Enter username and password (sticker on box)
4. Follow prompts on website
5. You will be randomized into Group 1(Continue with standard of care) or Group 2( Point of Care testing)
Patient enrolled into Group 1
1. Continue with regular standard of care, ensure PROACT worksheet is filled out, faxed and attached to PCR
Patient enrolled into Group 2
1. Continue Standard of care, and follow flow chart:
2. Blood Draw and point of care testing
3. Insure PROACT worksheet is filled out, faxed , then attached to PCR
What’s in the Box?
1: The Alere TRIAGE Meter, our point of care testing device:
What is it? Fluorometer designed to provide point of care testing for Troponin I and BNP cardiac markers using the Cardio 2 test device. It will give you Quantitative Results in ~ 20 minutes in the form of a print out. (Looks like a receipt).
2. A Black Box
This is a Quality Control Device. The only one that applies to the road staff is the Quality Control Test Device. It looks like a Test Device, except its colored differently (BLACK). They are pertinent for each meter. The QC Code Chip also in the black box is to be left in the box untouched. The test device is reusable and needs to be run at the start of each shift to insure the meter is calibrated; the laser is stable and accurately positioned. Without a passed QC test the meter will not function. Should the machine fall, or an extremely rough ride it needs to be retested to insure valid results and quality control. Record the daily check in the log sheet in the blue binder.
3. Paper rolls for the printer, an A/C cord (wall connection).
The Machine is to be left plugged in, and in the box and on the counter at all times. Should the paper run out the extra roll is to be inserted in the compartment on top of the screen. Insert it so as the paper runs along the top of the machine not across the roll. Feed into black roller, once in place press feed button and remove excess. Replace cover.
4. Purple topped tube/ Blue cylinder/IV blood draw adapter.
How do I use these things? Using the best possible sterile technique for the environment the IV adapter screws into the blue cylinder. Then the adapter is to screw onto the catheter hub. Once connected, place the EDTA (purple tube) into the cylinder and push onto male end filling the tube. The tube must then be inverted 6-8 times gently. This prevents coagulation of the sample preventing clots from ruining the test.
5. 1cc syringe and twin pak.
These items are utilized to remove .25cc exactly (any more or less , or any bubbles will result in an error message). Insert the needle into the top of the EDTA tube and withdraw .25cc ensuring all bubbles are removed from syringe for accurate sample size. Then place into sample port.
6. Two Cardio 2 test devices
What is the Cardio 2 test device? The Cardio 2 Device is a sample vehicle that has a reaction zone which contains fluorescence antibodies that have the ability to emit light. During the reaction analyte molecules in the sample react with the labelled antibodies creating a fluorescence analyte that can be quantified by the amount of fluorescent light they emit when excited by the laser. This process in turn analyzes the Troponin I and BNP levels in said blood sample.
IMPORTANT FACTS ABOUT CARDIO 2 TEST DEVICES
1. They must be kept refrigerated, once removed from fridge they cannot be replaced.
2. Once removed from the fridge each Device has a shelf life of 10 days at room temperature. Therefore, after the Cardio 2 Device is removed from the fridge, write the date it was removed on the foil package with the black marker provided on top of the fridge.
3. Just like Glucometers, Cardio 2 Devices must be calibrated with the reagent chip which is also in the Cardio 2 Test Device box in the fridge. It must be inserted in the meter and calibrated prior to using the device. This only has to be done when a different lot number is used. Lot numbers can be found on the side of the boxes as well as the testing devices.
4. They must sit for 15 minutes out of the fridge prior to being used to allow them to warm to room temperature
5. Do not remove the devices from the pouch until you’re prepared to use it.
6. When placing blood onto device slowly place .25cc into sample port allowing blood to saturate into sample port then insert into machine (Once you place blood into the sample port you have 30 minutes to insert it into the machine).Insert until resistance is felt and a click is heard. Then press BLUE (ENTER) BUTTON. Meter will then automatically insert device. Dispose of test device once test complete.